| Question / Issue |
 |
| DataPlus 4.0 Fishbowl - Act! Database Configuration |
| Answer / Solution |
|
PROGRAM: DataPlus 4.0 for Fishbowl - Act! Database Configuration
| Scenario 1
|
Scenario 2
Your Current Act Database
- Backup your current Act Database
- Perform the tasks below
- After fields are created you must modify your layouts.
- You can also extract the DataPlus Act layouts and use them as a template.
|
Create Custom Fields
Additional custom fields will be created in initial import.
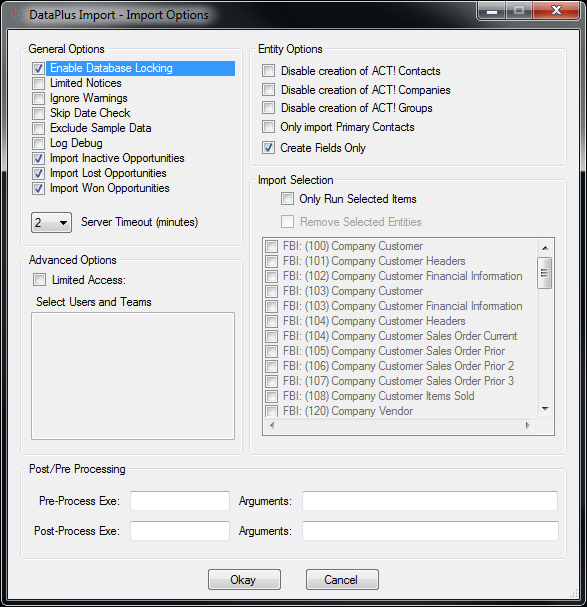
- Tools/DataPlus 4.0/Manual Import
General Options
- Check Enable Database Locking
Entity Options
- Check Create Fields Only
Or Entity Options
- Check Only Run Selected Items
- Check Each entity that you will be importing into Act!
- Click Okay
Before you actually perform the import, please read the entire KB article. There are some fields that should be manually created.
In order for the new Custom Fields to be available in Act!, after import is complete, exit Act! and reopen Act!. |
 |
Create Company Custom Fields
- Open Act!
- Click on Tools
- Click on Define Fields
Create, edit or delete fields
- View fields for: Companies
- Create the fields in layout in right pane
|
NOTE: DataPlus Import can create these fields for you.
We recommend that Address, Phone, URL fields be manually created.
Create the following fields
| Field Name |
Type |
Default Value |
Field length |
Default Permission |
Administrator Permission |
| AP2 Last Sales Order Date |
Date |
|
|
Read Only |
Full Access |
| AP2 Last Work Order Date |
Date |
|
|
Read Only |
Full Access |
| Creation Date |
Date |
|
|
Read Only |
Full Access |
| Last Update |
Date |
|
|
Read Only |
Full Access |
| SO2 Last Date |
Date |
|
|
Read Only |
Full Access |
| WO2 Last Date |
Date |
|
|
Read Only |
Full Access |
| ACTeStore |
URL |
|
|
Full Access |
Default |
| Application2 Login |
URL |
|
|
Full Access |
Default |
| Application2 URL |
URL |
|
|
Full Access |
Default |
| Help Desk |
URL |
|
|
Full Access |
Default |
| KB |
URL |
|
|
Full Access |
Default |
| Online Support |
URL |
|
|
Full Access |
Default |
| Act eMarketing Signup |
URL |
|
|
Full Access |
Default |
| Application2 Login |
URL |
|
|
Full Access |
Default |
| dpFolders Profile |
Character |
|
50 |
Full Access |
Default |
The following fields are important to DataPlus import and association between Fishbowl and Act.
DataPlus will create the following fields for you following instruction from "Line 1 or 27" in this KB.
| Field Name |
Type |
Default Value |
Field length |
Default Permission |
Administrator Permission |
| eFBCID |
Character |
|
24 |
Read Only |
Full Access |
| eFBEID |
Character |
|
24 |
Read Only |
Full Access |
| eFBLID |
Character |
|
24 |
Read Only |
Full Access |
| eFBVID |
Character |
|
24 |
Read Only |
Full Access |
| Account Number |
Character |
|
50 |
Read Only |
Full Access |
| Customer Number |
Character |
|
24 |
Read Only |
Full Access |
| FBC Account Number |
Character |
|
24 |
Read Only |
Full Access |
| FBP Prospect Number |
Character |
|
24 |
Read Only |
Full Access |
| FBV Account Number |
Character |
|
24 |
Read Only |
Full Access |
| Vendor Number |
Character |
|
24 |
Read Only |
Full Access | |
Create Contact Custom Fields
- Open Act!
- Click on Tools
- Click on Define Fields
Create, edit or delete fields
- View fields for: Contacts
- Create the fields in layout in right pane
|
NOTE: DataPlus Import can create these fields for you.
We recommend that Address, Phone, URL fields be manually created.
Create the following fields
| Field Name |
Type |
Default Value |
Field length |
Default Permission |
Administrator Permission |
| AP2 Last Sales Order Date |
Date |
|
|
Read Only |
Full Access |
| AP2 Last Work Order Date |
Date |
|
|
Read Only |
Default |
| Creation Date |
Date |
|
|
Read Only |
Full Access |
| Last Update |
Date |
|
|
Read Only |
Full Access |
| SO2 Last Date |
Date |
|
|
Read Only |
Full Access |
| WO2 Last Date |
Date |
|
|
Read Only |
Full Access |
| Contact AP2 Bill To |
Address |
|
|
Read Only |
Full Access |
| Contact AP2 Ship To |
Address |
|
|
Read Only |
Full Access |
| Direct Line Phone |
Phone |
|
|
Full Access |
Default |
| Toll Free Phone |
Phone |
|
|
Full Access |
Default |
| ACTeStore |
URL |
|
|
Full Access |
Default |
| Application2 Login |
URL |
|
|
Full Access |
Default |
| Application2 URL |
URL |
|
|
Full Access |
Default |
| Help Desk |
URL |
|
|
Full Access |
Default |
| KB |
URL |
|
|
Full Access |
Default |
| Online Support |
URL |
|
|
Full Access |
Default |
| Act eMarketing Signup |
URL |
|
|
Full Access |
Default |
| Application2 Login |
URL |
|
|
Full Access |
Default |
| Time Zone URL |
URL |
|
|
Full Access |
Default |
| dpFolders Profile |
Character |
|
50 |
Full Access |
Default |
The following fields are important to DataPlus import and association between Fishbowl and Act.
DataPlus will create the following fields for you following instruction from "Line 1 or 27" in this KB.
| Field Name |
Type |
Default Value |
Field length |
Default Permission |
Administrator Permission |
| eCustomer |
Character |
|
50 |
Read Only |
Full Access |
| eFBCID |
Character |
|
24 |
Read Only |
Full Access |
| eFBCTID |
Character |
|
24 |
Read Only |
Full Access |
| eFBEID |
Character |
|
24 |
Read Only |
Full Access |
| eFBLID |
Character |
|
24 |
Read Only |
Full Access |
| eFBVID |
Character |
|
24 |
Read Only |
Full Access |
| Account Number |
Character |
|
50 |
Read Only |
Full Access |
| Customer Number |
Character |
|
24 |
Read Only |
Full Access |
| FBC Account Number |
Character |
|
24 |
Read Only |
Full Access |
| FBCT Account Number |
Character |
|
24 |
Read Only |
Full Access |
| FBC Contact Reference Number |
Character |
|
24 |
Read Only |
Full Access |
| FBP Prospect Number |
Character |
|
24 |
Read Only |
Full Access |
| FBV Account Number |
Character |
|
24 |
Read Only |
Full Access |
| Vendor Number |
Character |
|
24 |
Read Only |
Full Access | |
Create Opportunities Fields
- Open Act!
- Click on Tools
- Click on Define Fields
Create, edit or delete fields
- View fields for: Opportunities
- Create the fields in layout in right pane
|
The following fields are important to DataPlus import and association between Fishbowl and Act.
Create the following fields.
| Field Name |
Type |
Default Value |
Field length |
Default Permission |
Administrator Permission |
| eDocumentID |
Character |
|
20 |
Read Only |
Full Access |
| eCustomerID |
Character |
|
50 |
Read Only |
Full Access |
| eFBCID |
Character |
|
10 |
Read Only |
Full Access |
| FBC Account Number |
Character |
|
10 |
Read Only |
Full Access |
| Customer Number |
Character |
|
50 |
Read Only |
Full Access |
| Company |
Character |
|
128 |
Read Only |
Full Access |
| Contact |
Character |
|
128 |
Read Only |
Full Access |
| Sales Representative |
Character |
|
128 |
Read Only |
Full Access |
| Document Number |
Character |
|
10 |
Read Only |
Full Access |
| Document Type |
Character |
|
20 |
Read Only |
Full Access |
| Document Status |
Character |
|
20 |
Read Only |
Full Access |
| Document Terms |
Character |
|
30 |
Read Only |
Full Access |
| Document Date |
Date |
|
35 |
Read Only |
Full Access |
| Document Create Date |
Date |
|
35 |
Read Only |
Full Access |
| Document Expiration Date |
Date |
|
35 |
Read Only |
Full Access |
| Document Expiration Days |
Decimal |
|
13 / 0 |
Read Only |
Full Access |
| Document PO |
Character |
|
30 |
Read Only |
Full Access |
| Document Note |
Memo |
|
|
Read Only |
Full Access |
| Document Item List |
Memo |
|
|
Read Only |
Full Access |
| Document Tax Exempt |
YesNo |
|
nbsp; |
Read Only |
Full Access |
| Document Tax Rate |
Currency |
|
13 / 2 |
Read Only |
Full Access |
| Document Total Tax |
Currency |
|
13 / 2 |
Read Only |
Full Access |
| Document FOB |
Character |
|
30 |
Read Only |
Full Access |
| Document Carrier |
Character |
|
30 |
Read Only |
Full Access |
| Document Bill To |
Address |
|
|
Read Only |
Full Access |
| Document Bill To |
Character |
|
50 |
Read Only |
Full Access |
| Document Ship To |
Address |
|
|
Read Only |
Full Access |
| Document Ship To |
Character |
|
50 |
Read Only |
Full Access | |
Create Opportunity Product Fields
- Open Act!
- Click on Tools
- Click on Define Fields
Create, edit or delete fields
- View fields for: Groups
- Create the fields in layout in right pane
Quantity Shipped and Quantity Back Ordered fields can be created using decimal places you choose for your business.
Example "13 / 2" instead of "13 / 5". |
The following fields are important to DataPlus import and association between Fishbowl and Act.
Create the following fields.
| Field Name |
Type |
Default Value |
Field length |
Default Permission |
Administrator Permission |
| Serialized |
Character |
No |
3 |
Full Access |
Default |
| Active |
Character |
Yes |
3 |
Full Access |
Default |
| Taxable |
Yes/No |
TRUE |
|
Full Access |
Default |
| UOM |
Character |
|
10 |
Full Access |
Default | |
Create Group Fields
- Open Act!
- Click on Tools
- Click on Define Fields
Create, edit or delete fields
- View fields for: Groups
- Create the fields in layout in right pane
|
The following fields are important to DataPlus import and association between Fishbowl and Act.
Create the following fields.
| Field Name |
Type |
Default Value |
Field length |
Default Permission |
Administrator Permission |
| eGroupID |
Character |
|
50 |
Read Only |
Full Access |
| eGroupIDParent |
Character |
|
50 |
Read Only |
Full Access |
| Group Source |
Character |
|
50 |
Read Only |
Full Access | |
Additional Custom Fields
Additional custom fields will be created in initial import.
- Tools/DataPlus 4.0/Manual Import
General Options
- Check Enable Database Locking
Entity Options
- Check Create Fields Only
Or Entity Options
- Check Only Run Selected Items
- Check Each entity that you will be importing into Act!
- Click Okay
|
| |