| Question / Issue |
 |
| dpSmartField Sample Configuration |
| Answer / Solution |
|
PROGRAM: dpSmartField - Sample Configuration
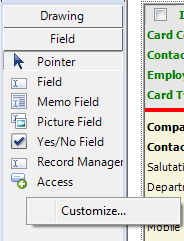
Act Contact Layout
- Open Act
- Navigate to Tools/Design Layouts/Contact
Tool Box
- Right Click menu
- Click on Customize menu
- Proceed to Sample Configurations
|
 |
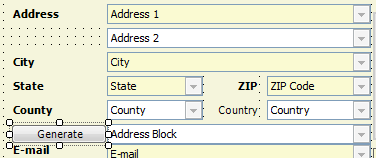
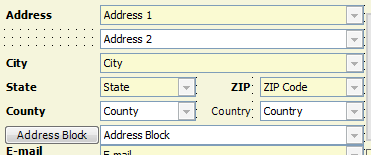
Sample 1 Address Block
Type: Auto Field
Fields
- City
- State
- ZIP Code
Target Field
- Address Block
Target Result
- City, State ZIP Code
San Antonio, TX 78216
|
| AllowNonAlphaNumberic |
True |
| PreserveOuterSpaces |
True |
| ReplaceAmpersandWithN |
False |
| Field 1 |
Field 2 |
Field 3 |
Custom Field |
| City |
State |
ZIP Code |
Address Block |
|
|
|
TemplateFirst |
| [City] |
[State] |
[ZIP Code] |
[City], [State] [ZIP Code] |
| San Antonio |
TX |
78216 |
San Antonio, TX 78216 | |
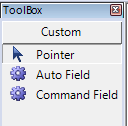
Act Contact Layout
Toolbox
- Open Act
- Navigate to Tools/Design Layouts/Contact
- Clock on AutoField
|
 |
Act Contact Layout
- Drag the button to location in your layout
|
 |
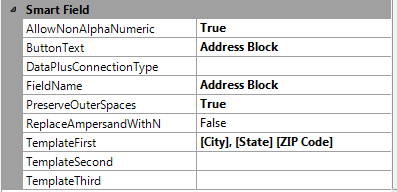
Act Contact Layout
- Open Properties window
Hint: F4
Properties
- Scroll down to "Smart Field"
- ButtonText Address Block
- FieldName Address Block
- TemplateFirst [City], [State] [ZIP Code]
|
 |
Act Contact Layout
- Name of button is now "Address Block"
- Save and close layout
|
 |
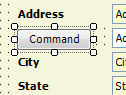
Act Contact Layout
Type: Command
Toolbox
- Open Act
- Navigate to Tools/Design Layouts/Contact
- Click on Command Field
|
|
Act Contact Layout
- Drag the button to location in your layout
|
 |
Act Contact Layout
- Open Properties window
Hint: F4
Properties
- Scroll down to "Command Field"
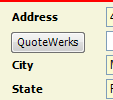
- ButtonText change "Command" to QuoteWerks
- ProgramArguments /n:q /c:7 /t:1
- ProgramPath H:\Applications\QuoteWerks\qw.exe
|
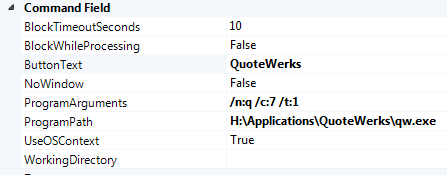
/n:q = opens new quote
- n:q = Opens new quote
- n:o = Opens new order
- n:i = Opens new invoice
/c:7 = retrieve the information into the Sold To, Ship To, and Bill To fields
- c:1 = Sold to Fields
- c:2 = Ship to Fields
- c:3 = Bill to Fields
/t:1 = value of TabNumber to open in QuoteWerks (Document Items)
- t:1 = Documment Items
- t:2 = Sold To / Ship To
- t:3 = Sale Info
- t:4 = Notes
- t:5 = Custom
/u:"Username" /p:"Password" |
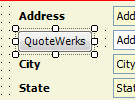
Act Contact Layout
- Name of button is now "QuoteWerks"
- Save and close layout
|
 |
Act Contact Layout
- Name of button is now "QuoteWerks"
|
 |
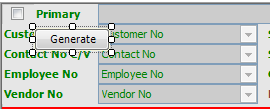
Customer No Generator
Type: Auto Field
Command Field
- Cust No
Target Field
- Customer No
Target Result
- 00-0000001
|
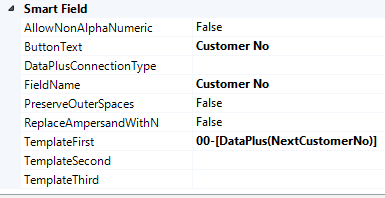
| AllowNonAlphaNumberic |
False |
| PreserveOuterSpaces |
False |
| ReplaceAmpersandWithN |
False |
| Properties |
Custom Field |
| ButtonText |
Customer No |
| TemplateFirst |
00-[DataPlus(NextCustomerNo)] |
| Result |
00-0000001 | |
Act Contact Layout
Toolbox
- Open Act
- Navigate to Tools/Design Layouts/Contact
- Click on AutoField
|
|
Act Contact Layout
- Drag the button to location in your layout
|
 |
Act Contact Layout
- Open Properties window
Hint: F4
Properties
- Scroll down to "Smart Field"
- ButtonText Customer No
- FieldName Customer No
- TemplateFirst 00-[DataPlus(NextCustomerNo)]
|
 |
Act Contact Layout
- Save and close layout
- Name of button is now "Customer No"
|
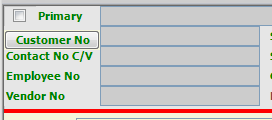 |
Act Contact
- Click on Customer No
- Act field should populate based on the DataPlus Configuration
|
 | |